

Imagery is an essential element of storytelling. Whether you’re a small artisan brand or a Fortune 500 company, the quality of the imagery and photography across your channels – including your website, social media, advertisements, and business collateral – plays a key role in your audience’s perception.
There is always a role for high-level imagery, and we often utilize professionals to capture our “A” shots. However, it can be challenging to afford professionals for any brand, especially a startup. We recommend that our clients cultivate some of their own abilities to generate shots in-house. Common needs for do-it-yourself photography include headshots for social media and quick photos of a new product. The good news is that you don’t need the world’s most expensive gear and design apps to produce quality images. Most modern mobile phones have powerful cameras that shoot clear, hi-res photos and videos. Today’s intuitive technologies have made it easy for everyone to be a creator. Here are some tips to help you gain the confidence to unleash your creativity and snap shareworthy content.
Have an idea and run with it
First things first: Before you even pick up your camera (or phone) and start snapping photos, you should have a solid conceptualization of what you’ll shoot. Ask yourself, “What story am I trying to tell?” and “How do I want to make the audience feel when they see this?”
There are times when inspiration strikes serendipitously, but without mapping out a plan, things can get blurry – literally and metaphorically. We highly recommend composing a shot list, which is a simple checklist of each photo you want to capture during a shoot. This will act as a guide to help you envision the content that will tell your story in a captivating, eye-catching way. In addition to the subject matter (more on that in a bit), have an idea for each photo’s setting, any props to add color and dimension, and other necessary elements.
Invest in technology that meets your needs
Year after year, major tech companies like Apple, Android, and Google immensely improve their mobile devices’ built-in cameras to take some of the best photos and videos you’ll ever see. Since 2014, Apple has been running its famous “Shot on iPhone” campaign, in which the electronics giant solely uses its own smartphones’ cameras to produce hi-res advertisements and digital content.
Using a tripod for your smartphone is a great place to start. Investing in a tripod with a Bluetooth trigger makes things super easy. You can also use light rings or a simple LED light package with stands to easily control the amount of light necessary for each shot. For a clean, crisp background – especially if your walls are not painted bright white – a large roll of white paper works nicely.
Here are some products we use at STIR and recommend:
Determine the focal point
Always make the subject the hero. Cramming too many elements into a single frame may result in a cluttered composition, causing the viewer to not know exactly what they should be looking at. Surrounding details can add color, complexity, and dimension, but by determining a clear point of interest, you’ll easily direct the viewer’s attention to the subject you intended.
Find a setting that draws immediate attention to your subject and find the proper position for it within the frame. Not every subject needs to be dead center. Many smartphone cameras have portrait mode, which provides a more selective focus.
One of the most trusted rules of thumb for photography is to get in tight. Minimize distractions and background clutter. Consider a shallower depth of field to ensure the focus is on the subject.
Composition is also important. Allow yourself roughly 15% larger images than you may think you need. Then, go in afterwards to crop out any excess elements around the edges.
Consider the atmospherics
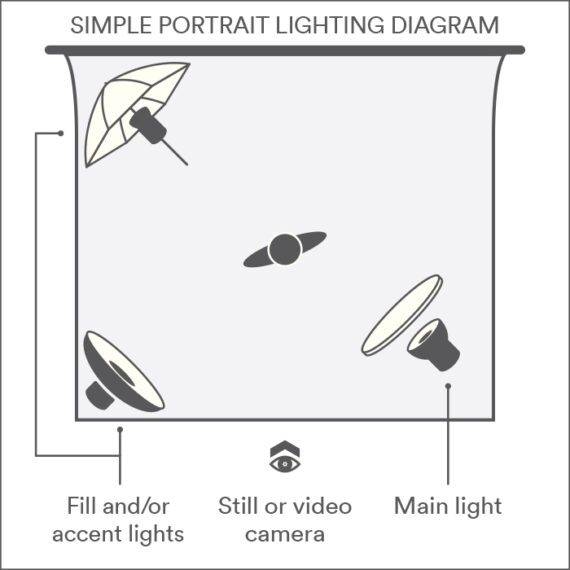
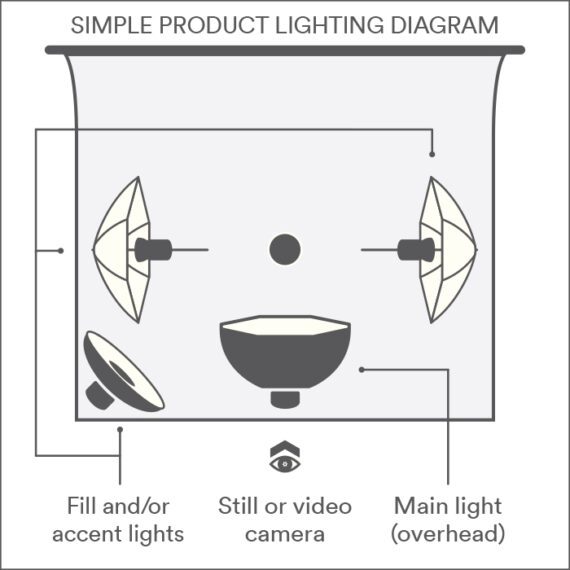
It’s all about the lighting, baby! The word photography literally means “drawing with light,” making this element extremely important. Lighting can make or break a photo. Chase natural sunlight if possible. Take advantage of “golden hour” – the first hour after sunrise and the last hour before the sun sets. Many photographers swear by the magic light golden hours provide. So, if you’re shooting outdoors, utilize the sun, even on cloudy days. You may also buy a ring light, which produces ideal lighting no matter the atmosphere or time of day.
Below are a couple of diagrams that demonstrate how to set up your lighting gear for portraits and products. Note that these setups call for three points of light and some simple light diffusers.
Play around with angles
Think about the perspective of the viewer. Do you want them to view the subject matter from an aerial point of view? Perhaps it looks more appealing at an upward angle. Testing a few angles can help your content stand out as well as help you visualize what works best. Various angles create different illusions, including depth and height. Try taking multiple photos of your subject from different angles.
When it comes to using the zoom feature, use it sparingly, if at all. While it may be extremely tempting to zoom in if you’re further away from the subject, this feature can actually diminish the quality of the picture. If you’re able to, physically move closer to the subject to catch the details and avoid an inadvertent grainy effect.
Understand how to manipulate the files
Your phone and computer have intuitive, built-in photo editing tools. You can do wonders to improve your images by learning the basics:
- Cropping
- Automatic image enhancement
- Vignette application
- Color saturation (i.e. how to make a photo’s tome cooler or warmer)
Get inspired
Especially these days, it’s easy to seek and find inspiration from the world around you. For one, we have websites and social media apps to scroll through. In addition to staring at our phones, turn to nature, art magazines, and other resources at your fingertips. Study famous photographers’ work. Browse photography and art books. Visit a museum. Watch films that have won awards for cinematography. No matter where you look, you’re likely to meet a muse. And most of all, be patient. Rome wasn’t built in a day, so take some time to practice and polish your skills.
If you’d like to discuss how to create visually compelling content for your brand, we’re happy to help. Contact Brian Bennett today to get the conversation started.
As a bonus, we recommend these sites that offer practical tips on how to master your photography skills.


